Why Choose Tankless Over Traditional Water Heaters?
Tankless water heaters have many advantages. One of the key benefits is the endless hot water they provide, ensuring you never run out. ... Read More
Same-Day Service Available
Need a Plumber in Knoxville? We’re Ready to Help!


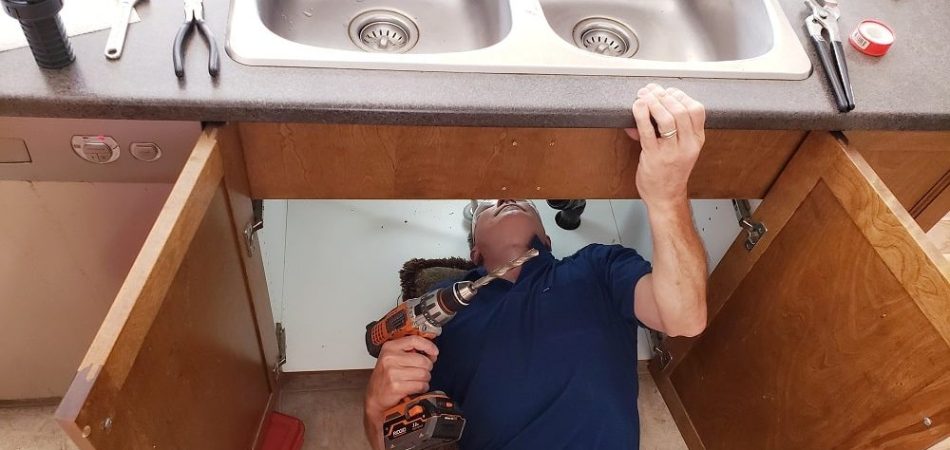
To install a kitchen sink drain, first remove the old one and clean the sink opening. Next, place plumber’s putty under the new basket strainer’s flange and press it into the sink hole from above. From below, secure it with the gasket, washer, and large metal nut. Finally, connect the tailpiece and assemble the P-trap before testing for leaks.
Installing a kitchen sink drain is the process of connecting the strainer, tailpiece, and P-trap so that dirty water flows safely into the home’s plumbing system. Following clear steps makes the job easy for beginners.
With a few tools and some care, the drain fits tightly, stops leaks, and keeps the kitchen working well. A new drain also keeps the sink clean by blocking smells and standing water. Good installation protects cabinets, floors, and walls from water damage. Learning the steps gives confidence and helps keep the plumbing in good condition for a long time.
The important steps you must follow to install a kitchen sink drain are:
Having the right tools and parts and knowing how to use them properly makes installing a sink drain much easier. You usually need a sink strainer, tailpiece, P-trap kit, slip joint nuts, washers, plumber’s putty, a bucket, and a wrench. Keep a towel close in case water spills while you work. Getting everything ready before starting saves time and helps the job go smoothly.
 You need to remove the old drain before putting in a new one. Place a bucket under the trap to catch any water, then loosen the nuts that hold the trap and tailpiece. After taking them out, clean off old putty or dirt from the sink opening. A clean surface helps the new drain seal tightly and work without leaks.
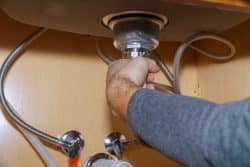
The strainer is the part where water from the sink first goes down. Roll some plumber’s putty into a thin rope and place it under the strainer flange. Set the strainer into the sinkhole, then tighten the locknut from underneath to hold it in place. The putty seals the gap so water does not leak under the sink. Wipe away any extra putty that comes out.
The tailpiece is the straight pipe that connects the strainer to the trap. Most kitchen tailpieces are 6 to 8 inches long and about 1 ½ inches wide. Shallow sinks typically use shorter tailpieces. whereas deep sinks or basement setups require longer ones. Keeping the tailpiece lined up correctly makes the whole drain system stable and leak-free.
The P-trap prevents sewer gases from entering the kitchen and keeps a small amount of water inside the bend. Before tightening, dry-fit the curved trap to the tailpiece and the trap arm to the wall pipe. Make sure the pieces line up and maintain the correct slope of about ¼ inch per foot, which ensures water flows steadily without pooling inside the pipe.
After checking the dry fit, slide and connect the P-Trap’s arm into the stub-out, which is a pipe that comes out of the wall. Adjust the height and angle so the trap bend connects neatly with the tailpiece. Make sure the slope stays correct in its position, as the wrong angle causes slow draining or water sitting in the pipes.
After the parts are lined up, you need to slide the washers and nuts into position and tighten each joint carefully. Begin by hand-tightening, then use a wrench to make the connection firm. Do not over-tighten, as this can damage the threads or crack the fittings. A snug, balanced connection keeps the drain sealed and free of leaks.
Once you are all done, turn on the faucet and let water flow through the drain. Carefully watch each connection and use a dry rag or paper towel to check for moisture around the joints. Keep a bucket under the trap to catch any drips. If you notice any leaks, loosen the joint, adjust the washer, and tighten it again for a better seal.
After confirming no leaks, wipe away any extra plumber’s putty pressed out during installation. This keeps the area clean and avoids dried clumps around the sink opening. A neat finish makes the installation look professional and helps maintain a tidy kitchen cabinet space.
Correct slope, proper fitting, and the right part sizes create a long-lasting drain system. Shorter assemblies work for basic sink setups, while deeper cabinetry or basement sinks benefit from longer tailpieces and adjusted P-trap designs. Tennessee Standard Plumbing is trusted for reliable, high-quality service tailored to your home’s needs. The skilled team handles everything from drain installation to maintenance with care and precision. With quick response times and expert solutions, they keep your kitchen plumbing running smoothly year-round.
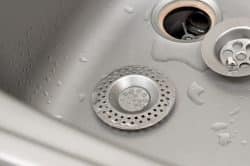 A kitchen sink drain is the system of parts that carries wastewater from the sink into the home’s plumbing pipes. It starts at the sink strainer, which sits at the bottom of the basin, and connects to the tailpiece, P-trap, and wall drain. The drain allows water and waste to leave the sink safely while blocking sewer gases from entering the kitchen.
The system works by guiding water through the strainer and tailpiece into the P-trap. The P-trap holds a small amount of water in its bend, which seals off odors from the sewer line. From there, water flows into the wall drain and continues through the home’s plumbing system.
Drain size and design vary with sink type. A single-bowl sink usually has one strainer and one P-trap, while a double-bowl sink has two strainers that connect to a shared trap assembly. Most kitchen sink drains measure about 1 ½ inches in pipe width, though depth and length depend on the sink’s design and cabinet space.
A kitchen sink drain system works by efficiently channeling wastewater from the sink basin through a connected network of pipes and fittings. The main parts include the sink strainer, tailpiece, P-trap, trap arm, and wall drain connection. Each part of the drain helps keep the system sealed and working properly.
Water goes through the strainer first, which stops large debris from entering the pipes. It then moves down into the tailpiece and finally into the curved P-trap. The P-trap holds a small amount of water that creates a seal, blocking sewer gases from rising back into the kitchen. The trap arm then guides the water into the wall drain, where it continues through the home’s plumbing system.
Common add-ons expand the system’s use. A garbage disposal connects directly to the strainer opening, grinding food scraps into smaller pieces before sending them through the pipes. An air gap, often found in dishwashers, prevents dirty water from siphoning back into clean water lines by creating a break in the flow path.
Gravity powers the movement of water through the entire system. For smooth drainage, pipes require a slope of about ¼ inch per foot. This steady decline keeps water moving forward and prevents it from sitting stagnant inside the pipes. Proper slope, tight seals, and the right connections ensure the drain system works efficiently every time the sink is used.
To remove an old kitchen sink drain, you need to clear the area, disconnect the P-Trap, remove the sink strainer locknut, then lift the old sink strainer and clean the drain opening. It is an easy and straightforward process when you follow the correct steps. Move slowly, protect the area, and use steady pressure on each fitting.
Let’s discuss the steps required to remove an old kitchen drain:
Turn off the water supply by the hot and cold shut-off valves under the sink. Place a bucket and towels in the cabinet. Unplug the garbage disposal, and switch off the power at the breaker for extra safety.
Set the bucket under the trap. Loosen the slip nuts on the trap and tailpiece by hand or with a wrench. Lower the trap and pour water into the bucket. Keep washers and nuts in a small container.
Hold the strainer from above. Use slip-joint pliers or a strainer wrench on the locknut under the sink. Turn the locknut counterclockwise. Break the seal by twisting gently to release old plumber’s putty.
Lift the strainer straight up from the sink. Scrape away old putty with a plastic scraper. Wipe the rim with a cloth and a bit of mineral spirits. Dry the surface so the new seal grips well.
Tennessee Standard Plumbing delivers friendly, expert help for stuck drains, damaged fittings, and new installations when a professional touch brings faster, cleaner results.
The tools needed for a kitchen sink drain installation include both basic plumbing hand tools and simple household items. Each tool plays an important role in securing parts, sealing joints, or keeping the workspace clean.
 Adjustable wrench: Tightens or loosens nuts and fittings of different sizes.
Having the right tools makes the installation smoother, faster, and less stressful while reducing the risk of leaks or loose fittings.
Installing the new drain flange correctly is important for stopping leaks and keeping the drain assembly stable. A tight flange makes a waterproof seal between the sink and the drain system, protecting cabinets and floors from hidden water damage.
To properly install the new drain flange, follow these steps.
Roll plumber’s putty into a rope and press it around the rim of the drain opening. This forms a flexible seal that keeps water from seeping under the flange.
Common mistake to avoid: Using too little putty creates gaps, while using too much leaves messy excess that squeezes out.
Press the flange firmly into the drain hole so the putty spreads evenly beneath it. This step locks the flange into place and prepares it for tightening from below.
Common mistake to avoid: Forgetting to press firmly enough leaves air gaps that later cause leaks.
Slide the rubber gasket and friction ring under the sink, then thread on the locknut. These parts hold the flange tightly against the sink.
Common mistake to avoid: Skipping the gasket or misaligning it weakens the seal and allows water to escape.
Use channel-lock pliers or a strainer wrench to tighten the locknut in small, even turns. This creates balanced pressure on the flange. Once secure, wipe away excess putty squeezed out around the sink opening.
Common mistake to avoid: Over-tightening the locknut cracks the sink or distorts the gasket, while uneven tightening breaks the seal.
Correctly installing the drain flange ensures the sink drain stays secure, watertight, and long-lasting.
To seal the connections and prevent leaks, you must close each joint carefully. Sealing connections properly keeps water from escaping in your kitchen sink drain system. Every joint stays tight and secure, so wastewater flows smoothly without leaking into cabinets or walls. Using the right sealing method for each part of the drain makes the system strong and long-lasting.
 Apply the plumber’s putty under the strainer flange before setting it in place. This creates a tight, waterproof seal between the sink and the drain opening.
Place gaskets and washers at every slip joint. They keep water from leaking out while letting the pipes stay flexible and easy to adjust.
Tighten each nut by hand first, then give it a small extra turn with pliers. This keeps the connection firm without breaking fittings or squashing washers.
Wrap Teflon tape around the threads on metal or plastic fittings. The tape fills tiny gaps and makes the joints seal better while tightening smoothly.
Choosing the right sealant for each connection ensures a leak-free drain system that performs well for years.
To avoid common mistakes when installing a kitchen sink drain, use the correct size pipes, avoid overtightening of the slip nuts, and maintain the proper slope of the drainage pipes. Installing a kitchen sink drain looks simple, but mistakes create leaks, poor drainage, or costly repairs. Understanding common errors and knowing how to avoid them ensures a long-lasting, efficient system.
To avoid these common mistakes, follow the instructions below:
 Use the correct size pipes and fittings for your sink and plumbing system
A careful DIY approach works for simple sink setups, but professional service ensures reliable results, especially for complex systems or stubborn drain problems.
To troubleshoot poor drainage, identify the root cause and apply the right fix to restore smooth water flow. Kitchen sinks slow down for several reasons, from simple clogs to improper pipe setup, and each issue requires a specific solution.
Follow the steps below to troubleshoot poor drainage:
Food particles, grease, or soap buildup often block the strainer or the curved trap under the sink. Remove debris from the strainer basket, then place a bucket under the trap and open the slip nuts to inspect for clogs.
 A drainpipe needs a slope of about ¼ inch per foot to move water the right way. A slope that is too flat makes water sit in the pipe. A slope that is too steep makes water move too fast and leaves solids behind. The right slope keeps the drain clear and flowing well.
Over time, dirt and residue build up in the P-trap and tailpiece. Take them apart, clean them well, and rinse with warm water before putting them back. This clears the pathway and helps water drain smoothly again.
Run water through the sink to confirm the problem is fixed. Watch for standing water or slow draining. If the flow remains weak, the issue may lie deeper in the sewer line.
Basic checks solve many drainage problems, but deeper plumbing concerns demand the skill of a licensed plumber to prevent costly damage.
To prevent clogs in a newly installed kitchen, ensure proper maintenance. It keeps a kitchen sink drain functioning smoothly over time and prevents frustrating clogs or leaks while preserving the investment in your plumbing system. A few simple habits and cleaning routines make a big difference in avoiding drain problems.
To prevent clogs, follow the instructions below:
Strainers and good disposal habits reduce clogs, but occasional manual cleaning is still needed. Consistent maintenance extends the life of kitchen plumbing, prevents costly water damage, and reduces the chance of emergency plumbing calls. Addressing small drainage issues early is important, since minor slowdowns often turn into major blockages or leaks when ignored.
For long-term care, Tennessee Standard Plumbing stands as the go-to expert for comprehensive kitchen plumbing services tailored to each home’s needs. Tennessee Standard Plumbing provides routine maintenance, professional drain cleaning, and prompt repairs that keep kitchens running smoothly throughout the year.
If you need dependable kitchen plumbing support, contact us today to schedule service.
You should call a plumber instead of DIY when leaks persist, fittings do not align, or water backs up even after cleaning the drain. Complex pipe replacements and hidden clogs in main lines also require professional help.
You choose top-rated plumbers for kitchen sink installation because they deliver precise work, use quality parts, and prevent costly future repairs. A trusted plumber also provides warranties and ensures compliance with plumbing codes.
A plumber’s putty is used in sink drain installation to create a watertight seal under the drain flange. It prevents water from seeping into the sink base and protects cabinets from water damage.
The questions you should ask a plumber for kitchen sink installation include the best drain materials, warranty details for parts and labor, the installation timeline, and long-term maintenance tips. These questions ensure you receive reliable service and durable results.
The purpose of a drain tailpiece is to connect the sink strainer to the P-trap. It acts as the vertical pipe that carries wastewater from the basin into the trap system.
Yes, you can reuse old drain parts if they are in good condition, free from corrosion, and fit properly with the new sink. However, most installations work better with new parts to prevent leaks.
You loosen a stuck drain flange by applying lubricating oil, tapping gently with pliers, and using a wrench to turn the locknut. Stubborn flanges sometimes require cutting with a hacksaw.
The drain flange should be tight enough to create a secure, watertight seal without cracking the sink. Hand-tighten it first, then use pliers for an extra quarter turn.
No, you do not need a new countertop to install an undermount sink if the existing countertop is in excellent condition. However, solid surfaces like granite or quartz support undermount sinks better than laminate.
You handle a clogged drain during installation by clearing debris from the strainer, cleaning the P-trap, and flushing the pipe with hot water. Severe clogs require a plumber’s auger.
You can use the sink after installation once all seals and connections are tightened and checked for leaks. This usually takes a few hours, depending on the sealant used.
The permits needed for sink drain installation depend on local building codes. Simple replacements often require no permit, but new drain lines or major plumbing modifications typically need approval.


Tankless water heaters have many advantages. One of the key benefits is the endless hot water they provide, ensuring you never run out. ... Read More

Plumbing leak detection equipment works by monitoring water flow, pressure, sound, or temperature to identify abnormalities that indicate a leak. C... Read More

Household drains are often overlooked until a clog disrupts your daily routine. From grease and coffee grounds in the kitchen to wipes and paper to... Read More