Fixing Water Pressure Issues
According to the U.S. Environmental Protection Agency (EPA), at just one drip per second, a single plumbing leak could waste up to 3,000 gallons of... Read More
Same-Day Service Available
Need a Plumber in Knoxville? We’re Ready to Help!


To install a bathroom sink drain, you first need to shut off the water supply and remove the old drain if necessary. Next, clean the sink drain opening, apply plumber’s putty or silicone around the drain flange, and insert the new drain through the sink from the top. From underneath, install the rubber gasket, washer, and nut, tightening securely but without overtightening. Finally, reattach the P-trap and test the new drain for leaks.
To install a bathroom sink drain means connecting the drain assembly of the sink to the home plumbing line so that water flows out safely. This task calls for leak checks, thorough sealing, and replacement or fitment of the drain parts.
Proper installation keeps the sink working and stops water damage from happening. Installing a bathroom sink drain calls on you to hire a skilled plumber, and many homeowners look for bathroom sink drain installers in Knoxville to ensure the job is done right.
At Tennessee Standard Plumbing, we deliver reliable service built on experience and care. Every project reflects our commitment to quality, efficiency, and long-lasting results for your home. If you want your bathroom sink drain installed the right way, contact us today!
Gather the required tools and drain assembly parts to make the installation smooth from the start. A complete set includes the drain body, flange, rubber gasket, lock nut, tailpiece, and P-trap. Tools like an adjustable wrench, pliers, a bucket, pipe tape, and plumber’s putty also stay necessary. Keeping a rag nearby helps with spills.
Starting without checking the size of the drain parts causes major fitting problems. Drain openings vary, so confirm measurements before you begin. Place all items on a flat surface to keep them visible and organized.
A helpful idea is to keep spare washers and putty ready. Small seals may tear or lose shape while tightening. Having extra accessories saves time and keeps the process stress-free.
After collecting all parts, double-check connections once fitted. Lightly tighten each section and test for leaks by running water. This ensures the base setup stays strong before you move to the next step.
 Shut off the water supply and place a bucket to avoid sudden spills and mess during work. Locate the shutoff valves under the sink, usually near the wall. Turn the handles clockwise until they stop. This blocks water flow completely. Once done, open the faucet to drain any water left in the line.
Placing a bucket right under the sink keeps the area dry when pipes open. Old drains may still hold water, so the bucket catches extra drops. Keep towels or a rag nearby in case water splashes around. An easy tip here is to mark the valves with tape before turning them back on. This simplifies future maintenance and avoids misunderstanding, as well as aids in keeping water control easy.
Watch the pipes closely, as you lose them after fixing the valves. Check around joints for any minor leaks. A few drops indicate that the valve is not properly sealed. Correcting it now prevents problems later on when the system is under stress.
Remove the old drain assembly to clear the way for a new one. Start by loosening the slip nuts that hold the P-trap in place. Use pliers or a wrench for tight spots. Once the P-trap is off, set it aside. Keep the bucket under the sink because water may drip out.
Next, unscrew the drain flange from the sink basin. Hold the drain body underneath while turning the flange above to prevent spinning. Once separated, pull the drain assembly out from under the sink. Clean up any plumber’s putty or sealant left behind.
A smart tip is to take a picture of the old setup before removal. This helps you remember the correct alignment for later.
When finished, run a quick check by touching the pipe ends. They should feel smooth with no cracks. This step ensures the new assembly connects tightly without future leaks. Even a small gap can become a problem after water flows again.
Clean the sink drain opening to give a smooth base for the new drain. Remove all old plumber’s putty, sealant, and dirt from the rim of the drain hole. A plastic scraper works well to clear tough residue without scratching the sink surface. Wipe the area with a damp cloth for a fresh, clean surface.
This task matters because any leftover debris stops the new flange from sealing properly. A poor seal allows water to escape, which later leads to leaks. So take time to make the opening spotless.
A helpful tip is to rub the edge with rubbing alcohol after cleaning. It dries fast and removes hidden grease that soap and water miss.
Once the drain hole feels smooth to the touch, check the fit by placing the new drain flange over it. It should sit flat without rocking. A flat, level fit ensures the next installation step holds firm. Testing the fit now saves effort and prevents adjustments later when water starts running.
Apply plumber’s putty and install the drain flange to make a watertight seal between the sink and the drain. Roll a small piece of putty into a thin rope and circle it around the underside of the drain flange. Press the flange firmly into the cleaned sink opening. Extra putty will squeeze out, which is normal.
This action prevents leaks from forming around the top edge of the drain. Skipping or using too little putty often leaves gaps that let water escape. Always keep the layer even so the flange sits flat.
One smart tip is to warm the putty in your hands before rolling. A softer putty spreads smoothly and holds its shape better.
After pressing the flange in place, wipe away excess putty with a damp cloth. A clean finish makes the area look neat and keeps the seal strong. A light pressure check ensures the flange is steady and fixed before moving to the next step.
Secure the drain body and install the rubber gasket & nut underneath from below the sink, then lock it in place with a nut. Slide the gasket onto the drain body and then thread the nut tightly against the sink bottom. This connection holds the drain in place and prevents leaks from under the sink.
Tighten the nut firmly, but avoid overtightening, as that may crack porcelain or strip threads. A pair of slip-joint pliers works well here. Always check that the gasket sits flat, because an uneven gasket weakens the seal.
It’s wise to keep the drain flange consistent from above when you’re torquing the nut underneath. This prevents the previously produced putty seal from shifting and keeps the flange straight.
Complete this process by moving your fingers along the joint. Confirm the drain body is fixed and firm. A strong and dependable link helps to prevent future water problems.
Attaching the tailpiece and reconnecting the P-trap involves fixing the straight pipe that connects the drain body to the P-trap. Slide the tailpiece into the drain body opening and secure it with the slip nut. The tailpiece directs water flow from the sink into the trap below.
Reconnect the P-trap to the tailpiece utilizing the washers and nuts already there. Check that the wall drainpipe is correctly aligned with the trap lines. This alignment is important since a bent connection strains the joints and causes leaks. First, hand-tighten, then use pliers for a light snug fit.
One useful trick is to dry-fit all parts before the last tightening. This guarantees that every item fits precisely without tension.
Finish this step by confirming that the tailpiece and trap appear stable. Push the trap gently from side to side to make sure there is no movement. At this point, a strong connection forms the foundation for a leak-free test in the following stage.
Turn on the water and test for leaks to see if your drain setup works properly. Slowly twist open the water valves and let water flow. Allow the sink to fill, then release the stopper so drainage happens smoothly. Watch each connection, the flange, tailpiece, and trap for any sign of dripping.
Wipe joints clean before checking so drops appear quickly. If you notice moisture, gently tighten nuts but avoid too much pressure. Using a flashlight helps you see in tight spaces and dark corners.
Helpful advice here is to test both hot and cold water. Temperature change makes pipes expand, which confirms the fittings hold firm.
Complete this step by leaving water running for a short while, then checking again. Once you see no moisture anywhere, your sink drain stands ready for daily use.
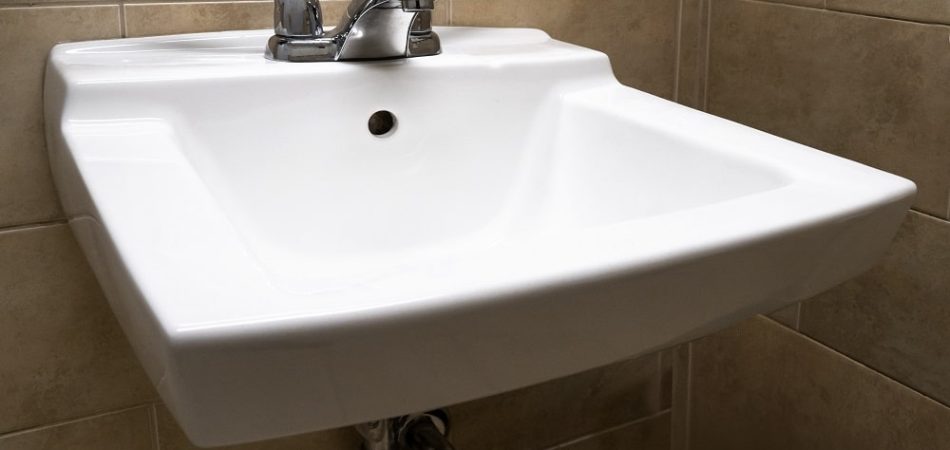
A bathroom sink drain is the pipe system that lets used water flow from the sink into the plumbing lines. Its main function is to move water away quickly and stop it from pooling inside the basin.
The drain includes a flange, a drain body, a rubber gasket, a nut, a tailpiece, and a P-trap. Each part connects tightly, so water flows without leaks. Some drains also include a stopper for holding water in the sink when needed.
Drains come in materials like metal, brass, or plastic. Brass lasts longer, while plastic is light and easy to work with. Choosing the right material keeps the drain secure and makes the sink system last longer.
To remove an old bathroom sink drain before a new one is installed, start by preparing the sink area. Clear the space, organize your tools, and make sure the workspace is safe. A proper start avoids unnecessary messes and makes each step simple. This task involves handling both top and bottom drain parts.
These are the following steps to remove an old bathroom sink drain to install a new one:
 Step 1: Turn off the water supply and clear the area under the sink.
Close the water valves and relocate any stored items below the sink. The work will be simple if your working area is clean. Check the water valves for potential leakages or cracks requiring repair. When this step is done, the sink is ready for more activity.
Position a bucket to collect trapped water. Unscrew the P-trap carefully and set it aside. Check the P-trap for buildup or wear, as some parts may be reusable. The drain system is now free of standing water.
Use pliers to loosen the locknut under the sink and slide it off. This nut often shows rust or wear, so inspect it closely. Once the nut is removed, the flange can be taken out.
Push the flange upward through the sink opening and take it out. Look for damage around the sinkhole or corrosion on the flange. The sink opening is now clear of the old fitting.
Wipe away old plumber’s putty and debris to leave a smooth surface. A clean base ensures a watertight fit for the next drain. The sink is fully ready for new parts.
The tools needed for the installation of a bathroom sink drain include more than just wrenches. Each tool serves a different purpose and makes the work smoother. The right set helps avoid leaks, keeps fittings tight, and reduces extra effort. Using them also ensures that the drain sits in place correctly from the first step.
An adjustable wrench has a movable jaw that fits many nut sizes. It is used to tighten or loosen nuts on the drain parts with steady control.
A pipe wrench has strong teeth that grip round pipes tightly. It works best when fittings are stuck or hard to turn by hand.
Channel-lock pliers have sliding jaws that adjust to several widths. They give a firm grip for slip nuts and are useful when space is limited.
A basin wrench has a long shaft with a swiveling head. It reaches behind sinks where normal wrenches cannot fit, making nut removal easier.
A screwdriver drives screws in or out with precision. It helps secure drain covers, brackets, and other small fittings during the process.
Plumber’s putty is soft and easy to shape around flanges. Silicone forms a waterproof seal. Both prevent water from leaking through small gaps.
A bucket collects water when the trap is disconnected. It keeps the workspace clean and stops water from spreading on the floor.
Towels or rags soak up extra water during installation. They also protect sink surfaces when tools are being used.
A hacksaw cuts through plastic or metal pipes. It is helpful when the drainpipe length does not fit the setup.
Plumber’s tape wraps around threaded joints. It seals the threads tightly and reduces the chance of leaks over time.
These tools help ensure a smooth and leak-free drain installation. A professional plumber is well aware of these tools and has them in the kit all the time.
To test for leaks after bathroom sink drain installation, you need simple checks that confirm the system works properly. Leak testing ensures safety and efficiency by stopping water damage before it spreads.
These are the following steps you can take to test leaks:
Filling the sink creates pressure inside the drain line. This helps reveal weak spots in seals or fittings. Make sure the water level stays high to apply enough weight. Any drop in water level without drainage means leakage around the stopper area.
Releasing the stopper sends a rush of water through the pipes. Watch the flow and check how fast the water leaves the bowl. Look under the sink at once for drips from visible joints. A slow release of water around the stopper suggests poor sealing.
Carefully check every nut, washer, and joint. Water sometimes escapes at points where metal and plastic meet. Do not only watch the main trap but also the side joints. A flashlight helps reveal small droplets that escape notice in dim light.
Wipe fittings, bends, and the backside of the trap. Damp spots show leaks not visible by eye. Cloth testing works well in narrow spaces behind the sink. If moisture keeps returning after wiping, sealing is weak, and repair is needed.
Tightening nuts gently often stops leaks at compression points. Add plumber’s putty or silicone where gaps appear. When leaks remain after basic fixes, professional service is safer. Experts handle deep pipe misalignment that home tightening cannot solve. Once the leaks stop, the sink is safe to use.
The common challenges in bathroom sink drain installation are loose nuts, misaligned pipes, and much more. Installing a sink drain may seem simple, but several challenges often arise during the process. Many problems come from tight spaces under the sink that limit movement. Other issues include old plumbing parts that no longer fit with new drains.
The following are the common challenges in bathroom sink drain installation:
Misaligned pipes mean the drain and waste line do not connect in a straight path. This misfit stresses joints and creates gaps for leaks. Tight corners make alignment harder, forcing parts together in the wrong position.
Leaks at joints occur when washers or gaskets do not sit evenly. Weak tightening or worn seals let water escape slowly. Hidden leaks damage wood and create mold in closed spaces.
A plumber’s putty is a soft sealing compound for drains. Using less material in open spaces, while overuse squeezes out and breaks the seal. Wrong placement leads to gaps around flanges and fittings.
Locknuts secure the drain body and trap. In small cabinet spaces, tools slip or fail to grip properly. Loose nuts leave fittings unstable, while overtightened ones damage threads.
Drain height means matching the sink drain with the wall pipe. Wrong levels create a poor slope, causing water to pool inside pipes. This stresses connections and slows drainage.
Threads keep joints sealed. Stripped or cross-threaded fittings lose grip, leaving water pathways open. Misaligned threads result from forcing parts together at the wrong angle.
A clogged or dirty drain surface prevents the flange from sealing tightly. Old putty, debris, or rust interferes with smooth contact. This creates uneven joints and leaks around the sink.
Low-grade plastic or mismatched parts fail under pressure. They warp, crack, or refuse to fit with standard fittings. Such parts shorten the drain’s life and invite constant drain repairs.
Over-tightening means turning nuts beyond the safe limit. This cracks porcelain or bends metal parts. Cracks spread with water pressure and lead to full replacement.
A poor slope is an insufficient downward angle in a drain. It keeps water standing in the pipe. Stagnant water builds pressure and encourages clogs. Wrong slope results from incorrect drain height or misfitted pipes.
Proper planning, the right tools, and sometimes professional help can prevent these common pitfalls.
Troubleshoot bathroom sink drain post-installation issues to ensure long-term performance and prevent water damage. A careful check after installation helps find problems early and keeps the system safe. These are the following troubleshooting steps:
Drain connections link the sink to the waste system. Loose or misaligned joints allow leaks and slow drainage. Secure joints keep water moving in the right direction.
The P-trap holds water to block sewer gases. A loose trap allows leaks under the sink. Replacing worn washers restores a proper seal.
Slow water flow shows a clog or poor slope. Backups push dirty water back into the sink. Testing with full sink drainage exposes hidden blockages.
The flange connects the sink to the drain body. A weak seal around the flange causes steady leaks. Even pressure on the gasket stops water from escaping.
Plumber’s putty fills gaps around fittings. Old or cracked putty breaks the seal. A fresh layer restores tight contact between the metal and the sink.
 Clear out any debris blocking the pipes or drain opening
Hair, soap, and small particles block the flow inside pipes. Debris near the opening prevents water from passing smoothly. Cleaning the line restores normal drainage.
A drain slope allows water to move by gravity. A flat or high slope traps water in the pipe. A correct slope reduces backups and improves efficiency.
Washers and seals keep joints watertight. A misplaced washer leaves gaps for leaks. Proper seating creates steady pressure and prevents water escape.
Regular inspection after installation catches minor issues before they grow into major plumbing problems. DIY adjustments solve many small errors, while serious leaks or drainage failures require a professional plumber. Early troubleshooting protects the home from water damage and costly repairs.
For trusted help, Tennessee Standard Plumbing is the local plumbing partner for complex troubleshooting and repairs. As trusted Knoxville bathroom sink drain installation experts, we provide thorough inspections, expert repairs, and complete bathroom plumbing solutions for both homeowners and businesses.
No. Installing a drain without a tailpiece is impossible, as it links the sink drain to the P-trap. It sets the height and the alignment for the flow. Without it, joints sit loose and leaks start fast. Smells rise from the trap area as well. Use the right length tailpiece for the setup. Match the diameter to the trap size. A secure tailpiece keeps the system tight and safe.
The best wrench for tightening the drain is a basin wrench. Its long handle reaches behind bowls and tight cabinets. The pivoting jaw grips drain nuts without slipping. An adjustable wrench helps open joints. Channel-lock pliers add control for compression nuts. Protect finishes with a cloth under the jaws. Steady pressure gives a complete seal without damage.
Measure the sink drain opening by checking the inside diameter. Place a ruler or tape across the inner edge. Measure the tailpiece and trap, too, to match. Record thread size where possible. Correct sizing prevents gaps, cross-threading, and drip points. Call a professional to accurately measure the sink drain opening. It saves you time, and you get an exact measurement without any trouble.
The old drain is stuck or corroded; start with penetrating oil. Let it sit, then work the nut in small moves. Heat from a hair dryer helps break light corrosion. Grip the flange with pliers using a cloth for protection. As a last step, cut the old body with a hacksaw. Wear gloves and eye gear. Replace damaged parts during removal.
No. We can reuse the old drain assembly that loses shape at the washers and seals. The metal surfaces develop pits and scratches due to years of use. Threads deform and stop sealing under pressure. Reuse invites slow leaks and odors. New parts give fresh gaskets and clean threads. A new kit installs faster and more safely. Fresh hardware protects cabinets and flooring from water stains.
The top DIY solution for unclogging a sink drain is hot water, baking soda, and vinegar. Pour hot water to soften grease. Add baking soda into the drain opening. Follow with vinegar to create fizz that lifts residue. Wait ten minutes for reaction time. Flush again with hot water to clear loosened debris. A small hand snake removes tougher plugs.
Dispose of the old drain parts through safe sorting and drop-off. Rinse parts to remove grime and residue. Place metal parts in a recycling bin or center. Put cracked plastics in household trash per local rules. Bag sharp fragments to protect handlers. Keep rubber gaskets separate from trash. Follow city guidance for best environmental practice.
Tighten the drain nut until it is snug and secure, then add a small turn. Hand-tightening first sets the gasket evenly. Use a basin wrench for controlled torque. Stop once resistance feels firm and even. Over-tightening warps gaskets and cracks porcelain. Under-tightening leaves gaps and weeps. Recheck after the first full sink of water. TN Standard is the best company to handle your bathroom plumbing issues.
Fix a clogged drain without delay with a plunger. Seal the overflow with a wet cloth for better pull. Pump steady strokes for about thirty seconds. Flush with hot water to move loosened grime. Use a hand auger for hair or deep plugs. Remove and clean the trap if buildup returns. Finish with a strainer to catch debris.
The drainpipe is too short; add an extension. Use a slip joint extension that matches the pipe size. Fit it between the tailpiece and the trap. Align the slope toward the wall outlet. Tighten compression rings evenly on both joints. Test with a full sink to confirm no drips. Trim excess length for a clean line.
Use plumber’s putty as a thin rope around the flange. Roll it between your palms for even thickness. Place it on the underside of the flange lip. Press the flange into the sink opening gently. Tighten from below and wipe the squeeze-out. The goal is full contact without lumps. Even coverage makes a long-lasting water seal.
Yes. We can use silicone instead of plumber’s putty, as it works on stone tops and porous surfaces. It resists staining and bonds well to many finishes. It cures into a firm gasket that handles splashes. Removal takes more effort during future service. The plumber’s putty stays soft and lifts out easily. Pick silicone for stone; pick putty for metal bowls. Match the sealant to the surface and task


According to the U.S. Environmental Protection Agency (EPA), at just one drip per second, a single plumbing leak could waste up to 3,000 gallons of... Read More

Frequent plumbing repairs can indicate that your pipes are aging, corroded, or near the end of their lifespan. In such cases, replacement is often ... Read More

Most of us take clean water for granted. But you may be surprised to know that your water is not as clean as you think it is! Without having a pers... Read More