Why Everyone Needs a Whole-Home Water Treatment System in Their Home
Most of us take clean water for granted. But you may be surprised to know that your water is not as clean as you think it is! Without having a pers... Read More
Same-Day Service Available
Need a Plumber in Knoxville? We’re Ready to Help!


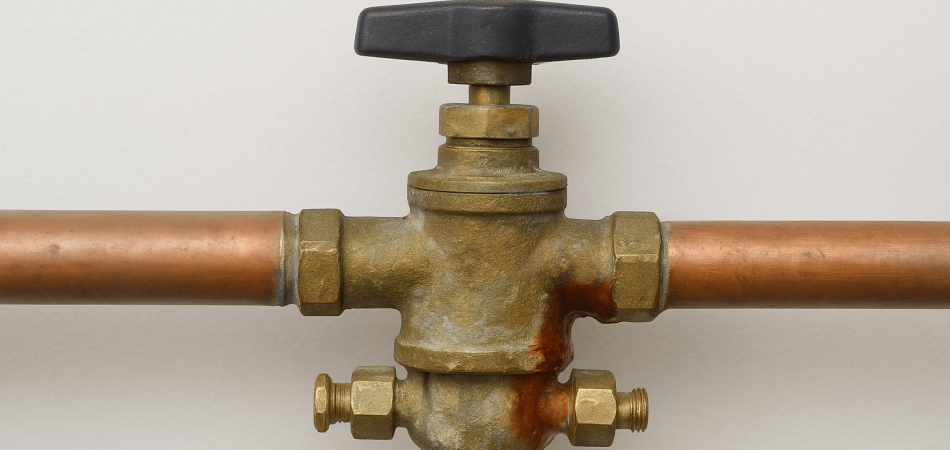
A backflow preventer is a simple device that protects your drinking water. It acts like a one-way valve. It stops contaminated water from flowing backward into your clean water supply. The device is a vital safety barrier for your home and community.
Here is a summary of the steps for installation and maintenance:
You collect all the required tools, fittings, sealants, and safety equipment for the job, ready at hand to do things with efficiency.
Check the existing backflow device with all associated plumbing. You specifically search for damage, corrosion, or leaks that indicate it should be replaced.
Shut down the main water supply, open the taps nearest to the installations, and drain the lines completely so that installation is done in a dry, safe environment.
Cut out a measurably sized section of the existing pipeline, cleaning and preparing the ends to ensure a secure, leak-proof connection.
Insert the backflow preventer in a gap between the pipes. Align and install it so that it is correct in height and matches the directional flow of water.
All fittings need to be tightened securely using pipe wrenches or other tools to ensure tight seals without causing damage by cracking or stripping.
Slowly turn back the water supply, then check very thoroughly for leaks and other issues. Observe whether or not the device is functioning properly.
You verify that the installation is in compliance with the current local codes, to standards for inspection, and conveniently located for access during future testing or maintenance.
For a dependable backflow preventer installation, you need an experienced service provider. Tennessee Standard Plumbing offers certified installation by individually licensed plumbers, ensuring your device is installed correctly and fully code-compliant. The team guarantees long-lasting protection for your water supply and peace of mind for your property.
Gathering the right tools is the first step to any successful project. You save time and effort by having everything ready before you start. Here is what you need:
Having these tools and materials on hand prevents unexpected trips to the hardware store. It helps your project move forward without delays.
You need to inspect the existing backflow device. Look for any visible damage or cracks. Check for signs of leaks around the fittings. You also need to confirm that the relief valves are not leaking water. A failing relief valve constantly leaks or drips. This signals that the device no longer protects your drinking water from contaminants.
Examine all the connections on the device. Check for signs of corrosion or rust. Corrosion weakens the joints and creates a risk for future leaks. A thorough visual check helps you confirm the device needs a replacement. It also gives you a better idea of how the old plumbing is configured.
The main purpose of this step is to assess the condition of the entire system. You confirm the current device is a total loss. You also identify any surrounding issues. A complete inspection ensures a smooth transition to your new backflow preventer.
This is the most crucial step for your safety. Turn off the main water supply to your property. Locate your main shutoff valve. It is usually found near the street or where the water line enters your home. Turning the valve clockwise stops the flow of all water.
Next, relieve all pressure from the lines. Open an outside faucet or spigot. This simple action drains the water from the pipes. You prevent a rush of water when you cut into the old plumbing.
Wait until all the water stops flowing. Now your pipes are completely depressurized. The work area is dry. Now proceed with the replacement without the risk of a flood.
You need to create a clean, straight cut on your pipes. You make this cut to create a space for the new backflow preventer. A pipe cutter is the best tool for this job. It makes a precise, clean cut on Polyvinyl chloride (PVC) or copper pipes. A hacksaw works, but a straight cut takes more effort. Measure the correct length of pipe you need to bridge the gap. Then you make your cut.
After you cut the pipes, prepare the connections. You will use two different sealants. First, you get your Teflon tape. You wrap the tape around the male threads on the pipes. Wrap it clockwise. This ensures a tight seal when you twist the fitting on.
Second, you apply pipe thread sealant, sometimes called pipe dope. You add a thin layer of sealant over the tape. This creates a powerful, leak-proof barrier. This step is vital for a strong connection. It helps your installation last longer.
Now you mount the new device into the space you created. A new backflow preventer needs to be mounted in the right place. It must sit above the highest sprinkler head in your system. This elevation prevents dirty water from being pulled back into your main water line. It also protects your device from dirt and freezing temperatures.
The device itself has a directional arrow. The arrow tells you which way the water flows. You must install the device with the arrow pointing away from your water supply. An incorrect orientation stops the device from working at all. You secure the device in its proper location, preparing it for the final connection.
You use pipe fittings to bridge the gaps in your cut pipe. Connect all the parts to the device. The device should sit level and balanced. It should not be leaning or wobbling. This ensures a proper and lasting installation.
You now tighten the fittings to create a secure bond. Use a pair of pipe wrenches. You use one wrench to hold a fitting in place. The other wrench turns the pipe. You twist the connections until they are snug.
It is important not to overtighten. Forcing the connection too much causes the plastic fittings to crack. It also strips the threads. A solid, firm connection is all you need. You want the seal to be watertight. You do not want to damage the materials.
You give the whole assembly a final check. You hold the device and try to wiggle it. It should feel solid and secure. The entire backflow prevention assembly must feel stable and firm. This confirms the new device is ready for its purpose.
 It is time to restore the water supply. Turn the main water valve on very slowly. A slow turn prevents a sudden rush of water. A sudden surge stresses the new connections. Listen for any sounds of rushing water. A loud gushing sound points to a problem.
Now, inspect your work. Look closely at every connection for any drips. Feel along the joints for any signs of moisture. A small drip means you have a leak. When you find a leak, turn off the water again. You need to unscrew the fitting, apply more sealant, and re-tighten the connection.
Finally, test the system under pressure. Turn on one of your sprinkler zones. Let the water run for a few minutes. This tests the new device and pipes with a full flow. Watch all the connections for any new drips or moisture. A successful test means your installation is complete.
Backflow preventers are a legal requirement in many communities. They protect the public drinking water from contamination. Your local water authority or city government has specific rules. They dictate the exact type of backflow device you must install. It is your responsibility to follow these regulations. Check the local plumbing codes before you begin.
Proper installation also means you have good access to the device. The backflow preventer requires a location that is easily accessible. You need enough space to perform routine inspections and future repairs.
A final certification is often required. Some cities demand that a certified professional inspect and test your new device. The professional checks that the device works correctly. They confirm it meets all local standards. A passing grade gives you a certificate. You submit this document to your water company. This final step guarantees your water supply is safe and secure.
Mistakes you should avoid when installing a backflow preventer save you a lot of trouble. Even a small error leads to big problems.
Here are the most common mistakes to steer clear of:
You place the backflow preventer in a pit or vault underground. This makes it hard to see or reach the device. Dirt, debris, and freezing temperatures in winter damage its parts. Always install the device above ground.
The backflow preventer’s relief valve sits too close to the ground. This valve releases water if a problem occurs. When placed too low, it floods from rain or groundwater, making it useless. Install with enough clearance to allow proper drainage.
You install the backflow preventer far away from the water meter. A long, unprotected pipe picks up contaminants. You avoid this risk by placing the device right after the main meter.
A small arrow on the side shows the direction of water flow. An incorrect setup means the device cannot do its job. Water flows through it in the wrong direction. Pay attention to this arrow. The arrow always points away from the water source.
A separate pipe goes around the backflow preventer. This bypass line allows dirty water to enter your clean drinking water supply. Never install a bypass line. Every drop of water must flow through the backflow preventer.
You block the relief valve or connect a pipe to it. The relief valve releases a large amount of water if the device is failing. A blocked valve cannot release this water. This causes pressure to build up inside the device. You must keep the relief valve completely clear.
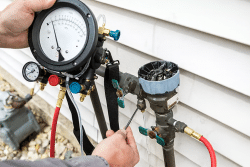
A backflow preventer has internal parts that wear down over time. A professional test confirms the device works properly. Skipping the test means you risk contamination. Schedule a yearly check with a certified tester.
You now know the most common mistakes in a backflow installation. Avoiding these errors makes your project successful. It also guarantees your device protects your home and community from dirty water.
The best practices for maintaining a backflow preventer are simple. Consistent care helps your device last a long time. It also guarantees your water stays safe.
Here are the best practices you should follow:
You must test your backflow device every year. A certified professional performs this test. The test confirms the device is working properly. It also proves the device protects your drinking water.
You keep a record of all tests and repairs. This includes a copy of the annual test reports. Good records help you track the device’s condition over time. You also have a history to show your water company.
The device must always be easy to get to. You need space to perform inspections and repairs. An accessible location makes routine checks simple. It also helps a professional technician during the annual test.
Outdoor units are at risk in cold weather. Freezing water expands and cracks the internal parts. You must winterize your device before the first freeze. This includes draining the water and adding insulation.
You regularly inspect the device yourself. You look for any drips or seepage. You also check for corrosion on the fittings and valves. A quick visual check spots small issues before they become major problems.
The device contains internal strainers and parts. Debris and sediment build up over time. This buildup stops the device from working correctly. You must clean these parts periodically to ensure a smooth flow of water.
The shutoff valves and test cocks need to be used regularly. A valve that is not used becomes stiff. You operate these valves a few times a year. This allows them to work freely and prevents them from getting stuck.
A repair requires the right parts. You must use parts approved by the manufacturer. Generic parts do not fit correctly or work as well. Having the right parts protects your warranty and guarantees the proper functioning of your device.
Your annual tester should be certified. Ask to see their credentials before starting the test. You want a qualified person working on your device. This step guarantees the test is accurate and valid.
Adhering to these practices prolongs the lifespan of your device. It keeps your water safe and your backflow preventer working properly. Regular maintenance is a small price to pay for big peace of mind.
You can hire a certified backflow installation service provider based on a few key factors. Choosing the right professional is important for the safety of your water.
Here are the key factors you should check:
A certified professional has passed exams and understands the different types of devices and their proper use. This certification indicates that they have received the necessary training to protect the public water supply.
An experienced provider has worked on numerous setups, including residential sprinkler systems, fire suppression systems, and commercial plumbing systems. A seasoned provider knows how to handle challenges and ensure a correct installation for your specific needs.
This ensures the work complies with all local codes. It means the provider knows the type of device your system requires, as well as the correct installation height and location. This makes your new installation inspection-ready.
The company provides a clear written quote before any work starts, breaking down costs for labor, parts, and permits. This avoids hidden charges and builds trust with the provider.
Choosing the wrong professional comes with big risks. A poor installation causes water contamination. It also leads to failed inspections. A failed inspection means you get a costly repair later on. You need a provider that does the job right the first time.
You need a certified service provider that offers expert installation. Tennessee Standard Plumbing is a licensed, certified, and award-winning company that delivers code-compliant installations. The company also provides annual testing and dependable maintenance, ensuring long-term protection for both household plumbing and the community’s water supply.
You can know if your backflow preventer needs replacement by noticing signs like leaks, unusual water taste or odor, dripping from the relief valve, or low water pressure. When the device frequently fails testing or needs constant repairs, it’s more cost-effective to replace it.
A backflow preventer should be replaced every 5–10 years on average, depending on usage, water quality, and maintenance. Outdoor units exposed to weather require earlier replacement compared to indoor installations. Frequent testing and servicing help extend its life, but if it fails inspection repeatedly, replacement is the best option.
You should schedule backflow prevention services at least once a year to ensure your system remains protected. Annual testing ensures your device is working correctly and protecting drinking water from contamination. Regular servicing also helps identify small issues before they develop into major problems.
Yes. A malfunctioning or improperly installed backflow preventer causes low water pressure in your plumbing system. It is due to debris buildup, failure of valves, or worn internal parts. Regular maintenance and professional testing are the best safeguards against these inconveniences, ensuring that the device is correctly adjusted and not unnecessarily restricting water pressure.
The common errors that damage a backflow preventer over time include poor installation, lack of annual testing, skipping maintenance, and exposure to freezing weather without protection. Allowing sediment buildup or using harsh cleaning chemicals also shortens its lifespan. Ensuring proper care, timely repairs, and correct installation helps prevent premature damage.
Yes. Backflow preventers need regular cleaning to remove sediment, scale, and debris that block valves and affect performance. Without cleaning, the unit leaks, sticks, or causes low water pressure. Professional cleaning ensures smooth operation, prolongs the lifespan of your system, and prevents contamination from entering your water supply.
To replace a backflow preventer, it typically costs between $300 and $3500, depending on the size, type, and location of installation. Residential units are on the lower end, while larger commercial devices cost more. Additional expenses include labor, permits, and testing fees required by local regulations.
Yes. A permit is required to install or replace a backflow preventer in most areas, as it protects public water supplies from contamination. Local codes mandate both permits and certified testing after installation. Always check with your municipality to ensure compliance before starting replacement, as unpermitted work faces penalties.


Most of us take clean water for granted. But you may be surprised to know that your water is not as clean as you think it is! Without having a pers... Read More

Hydro jetting is an effective, non-invasive plumbing method that employs high-pressure water to eliminate tough blockages and deeply clean the insi... Read More

Drain cleaning equipment ranges from simple manual tools for minor clogs to heavy-duty professional machinery for severe blockages in main sewer li... Read More